By Olga Zaborceva, Dental Lab Manager at Bio-Dent Laboratories
How to Send Cases to a Dental Lab: A Step-by-Step Guide for Dental Practices
Sending a case to a dental laboratory sounds straightforward. In practice, it is one of the most frequent sources of avoidable delays, remakes, and communication breakdowns in the dentist-laboratory relationship.
The problem is rarely the dentist’s clinical work. It is usually the documentation, packaging, or communication surrounding the case — information that was assumed rather than written, a prescription that was incomplete, an impression that was not protected in transit, or a shade that was never recorded. These are not clinical failures. They are workflow failures, and they are entirely fixable.
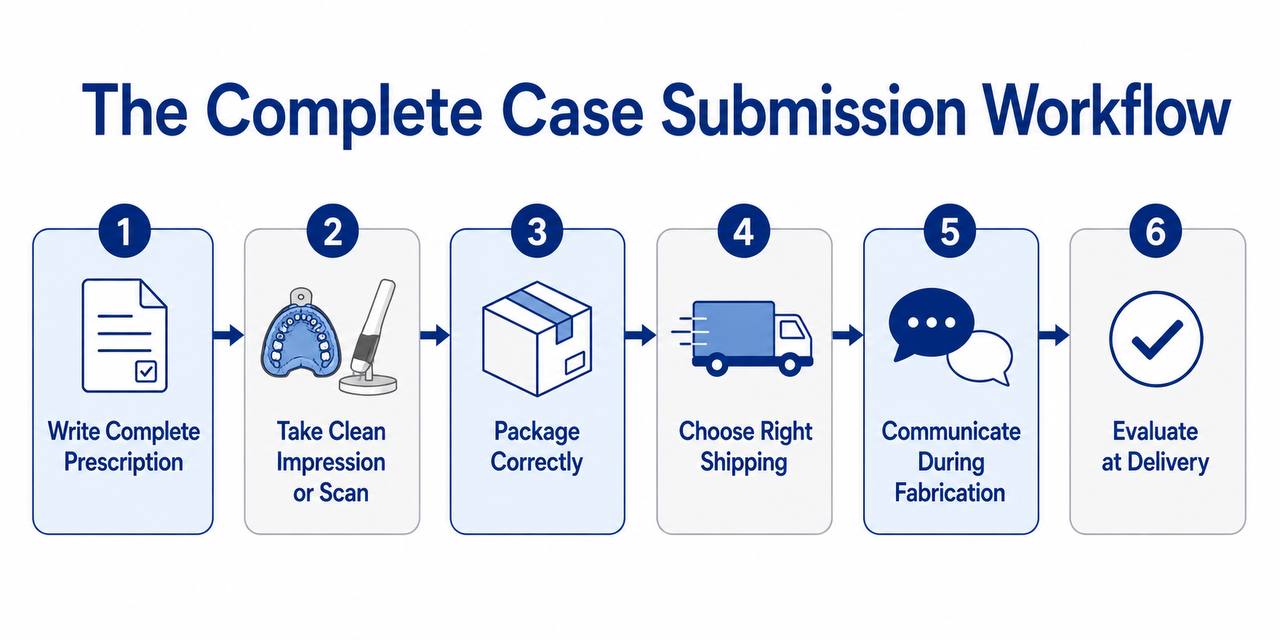
This guide covers every step of the case submission process — from writing the prescription to tracking the return shipment — with specific attention to the points where practices most commonly lose time and quality.
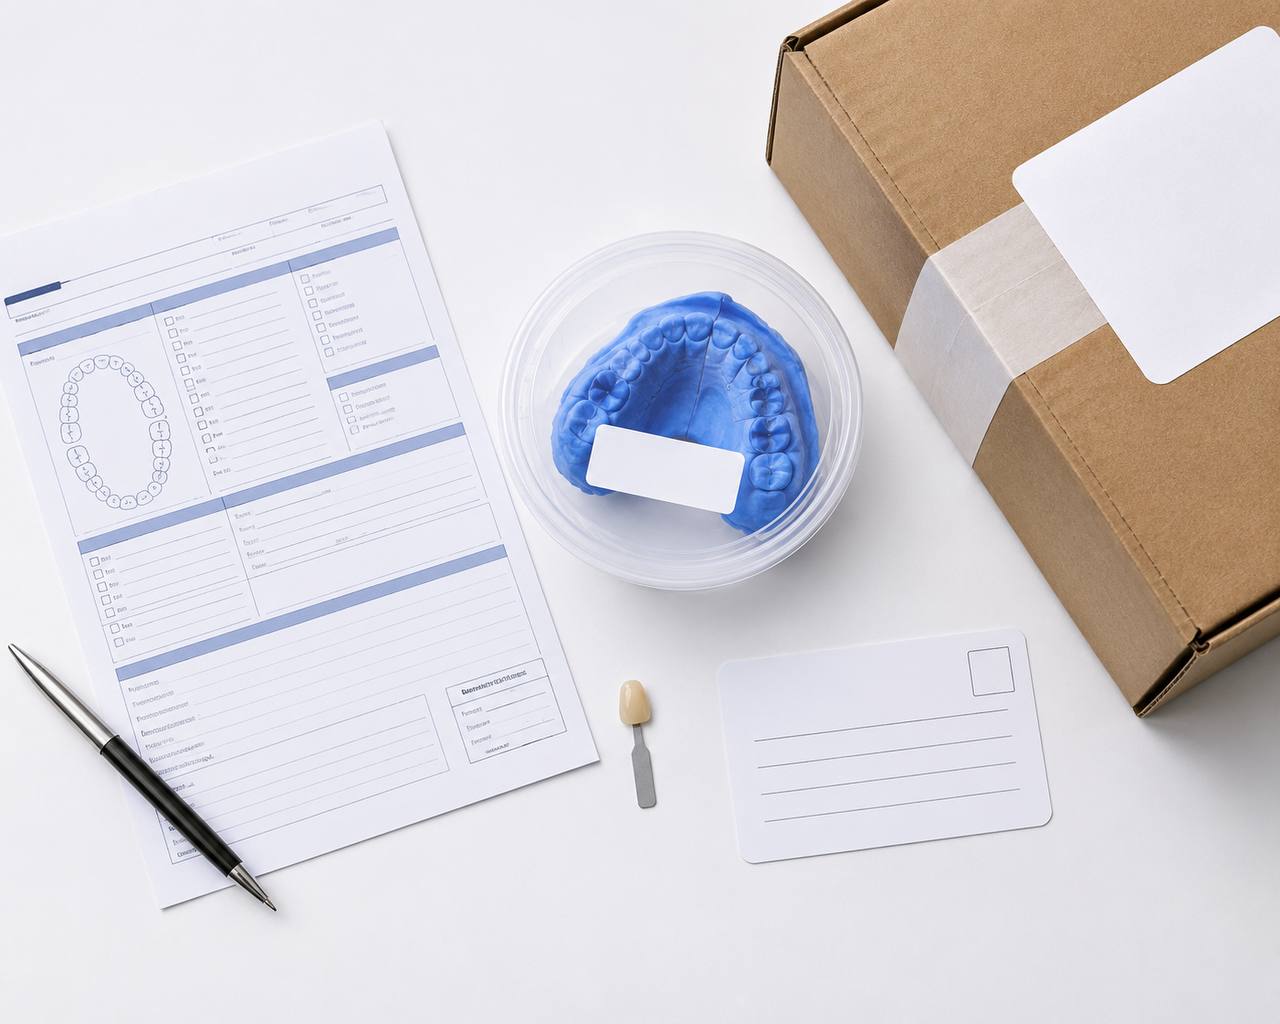
Step 1: Write a Complete Prescription
The prescription is the laboratory’s primary instruction document. Every decision the laboratory makes about your case — material, design, shade, margin placement, occlusal contacts — is either guided by the prescription or made by assumption in its absence. Assumptions made by the laboratory are not always wrong, but they are not always what you wanted.
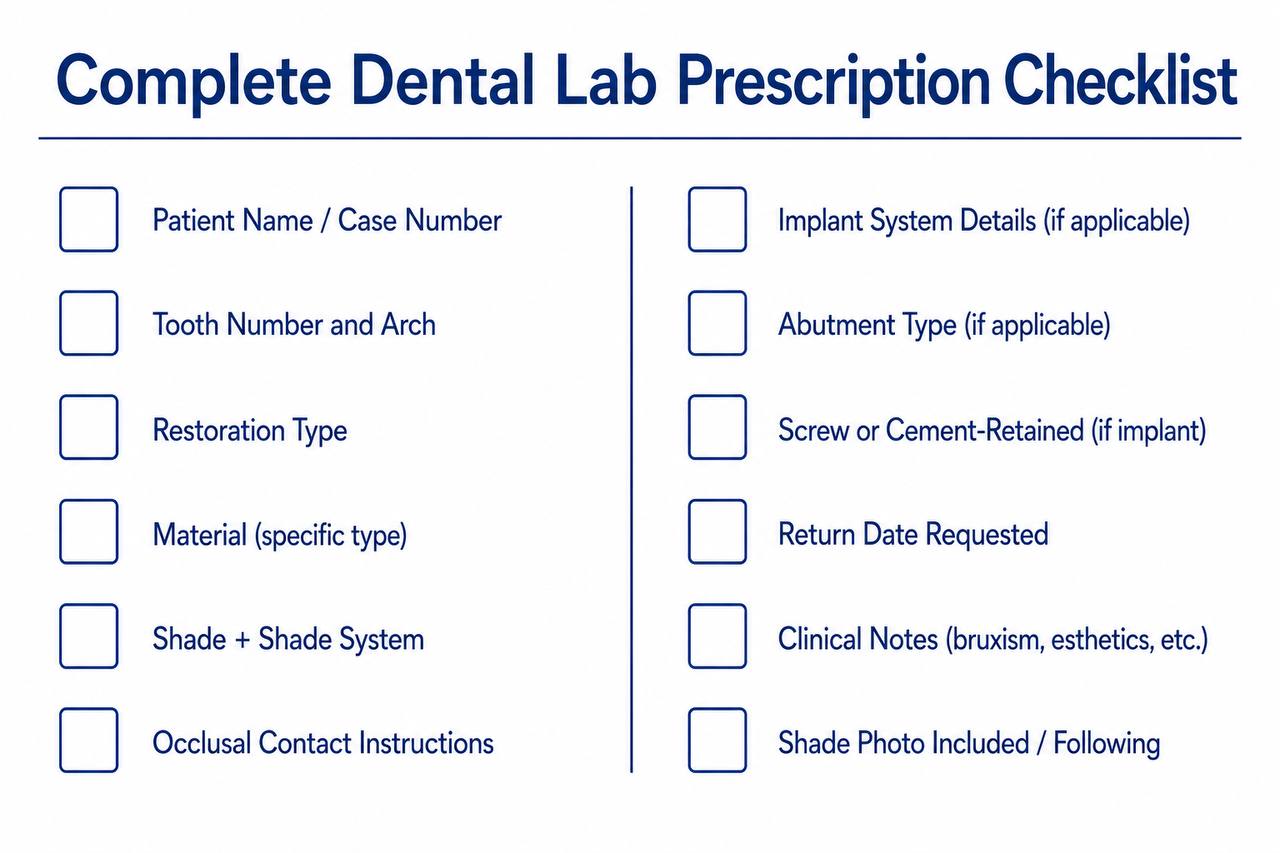
A complete prescription contains the following elements without exception:
- Patient information. Name or case number, age if relevant to material or shade selection, and any clinical notes that affect fabrication — bruxism, parafunction, metal allergies, esthetic sensitivity, prior ceramic fractures.
- Tooth number and arch. Written explicitly. Do not assume the laboratory will infer the tooth from the impression alone.
- Restoration type. Single crown, bridge with span specification, veneer, onlay, implant crown, partial denture, complete denture. Be specific — “crown” is not sufficient for implant cases.
- Material. The exact material you want: monolithic zirconia, ultra-translucent zirconia, layered zirconia, pressed e.max, PFM, full-cast gold, PMMA provisional. Not “zirconia” — the type of zirconia. Not “ceramic” — the specific ceramic.
- Shade. The shade tab designation (A2, B1, C3, etc.) and the shade system used (VITA Classical, VITA 3D-Master, Ivoclar Chromascope). If you took a shade photograph, include it or note that it will follow digitally. If shade matching to an adjacent restoration is required, note the material of that restoration.
- Occlusal contacts. Whether you want centric stops on the restoration, whether you are requesting any specific occlusal design, and whether the patient has any occlusal issues the laboratory should know about.
For implant cases specifically. Implant manufacturer, system name, implant diameter, platform connection, abutment type (stock with part number or custom), and whether the restoration is screw-retained or cement-retained. Every implant field is required — none are optional.
Return date requested. Not demanded, but requested. Give the laboratory a target delivery date and let them confirm whether it is achievable. A date that the laboratory cannot meet will be communicated back to you — which is better than discovering it at the delivery appointment.
Step 2: Take or Capture the Impression or Scan
The impression or scan is the physical record from which the laboratory fabricates the restoration. Its quality determines what is possible at the fabrication stage — the laboratory cannot produce a crown that fits better than the impression or scan allows.
For traditional VPS impressions:
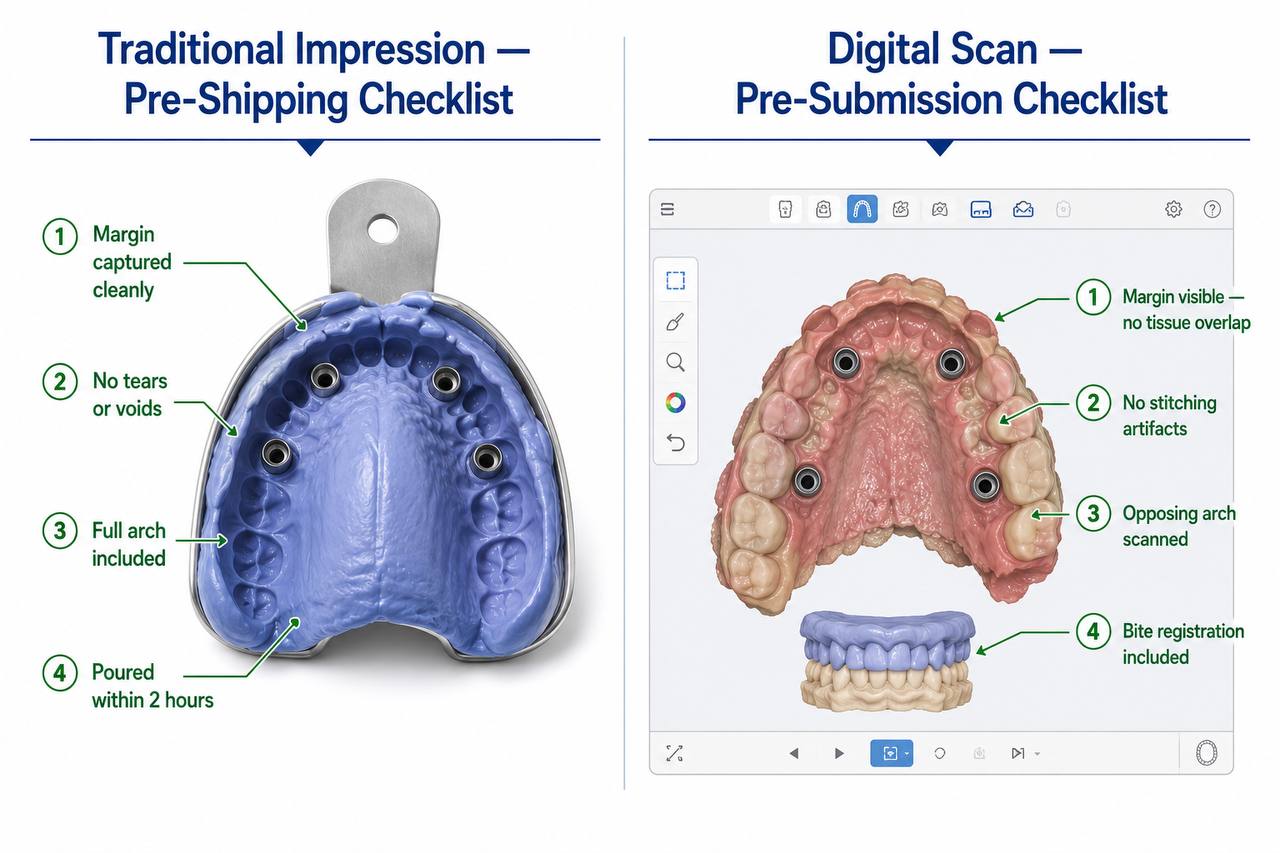
Take the final impression and an insurance impression immediately afterward. The insurance impression takes two additional minutes at the chairside and eliminates the most common cause of case delays — an impression that needs to be retaken after the patient has left.
Pour the impression within the manufacturer’s recommended timeframe. Most VPS materials should be poured within two hours of removal from the mouth for maximum dimensional accuracy. If you cannot pour immediately, store the impression in a cool, dry environment — not in water.
Examine the impression before it leaves your office. Check the margin for tears, voids, or soft tissue interference. Check that the impression captured the full preparation including all finish line detail. A two-minute examination at chairside is faster than a one-week delay for a retake.
Include the opposing arch impression and a bite registration. Both are required for crown fabrication. Cases that arrive without an opposing arch or bite registration cannot proceed without contact to the practice.
For digital scans:
Complete the scan with retraction and isolation adequate to capture the margin without soft tissue interference. Scan the preparation, the full opposing arch, and a bite registration. Review the scan on the scanner software before closing the case — look for voids at the margin, stitching artifacts, and tissue overlap.
Export in the format your laboratory accepts. BioDent accepts STL files from all major scanner systems. If you are submitting digitally, use the laboratory’s preferred submission portal or email the files with the prescription attached.
Include a shade photograph with a shade tab positioned adjacent to the preparation tooth. Digital cases frequently arrive at the laboratory without shade photographs — the scan captures form but not color, and shade tab notations alone are less reliable than a calibrated photograph.
Step 3: Package the Case Correctly
Poor packaging is a more common source of case damage than most practices realize. An impression that arrives distorted, a model that arrives fractured, or a partial denture that arrives with a broken clasp from inadequate protection are all preventable — and all delay the case by at least several days while the practice retakes or the laboratory assesses the damage.
For impressions:
Place the impression in a sealed zip-lock bag.
Do not wrap it in paper towel or place it loose in the box — paper towel can stick to impression material, distorting fine margin detail when removed. Place the bagged impression in a rigid container — a prescription box or a hard-sided case insert. Do not allow it to be compressed against other items in the shipping box.
If you are including a poured stone model, wrap it separately in bubble wrap before placing it in the box. Stone models fracture in transit when inadequately protected.
For existing prosthetics sent for repair or modification:
Wrap the prosthesis in bubble wrap and place it in a rigid container. Do not send dentures or partial frameworks loose in a padded envelope — even minor compression can fracture an acrylic base or bend a clasp.
For shade tabs or photographs:
Include physical shade tabs in a sealed bag, clearly labeled. Digital photographs should be transmitted separately with the prescription — do not rely on photographs to survive transit in a physical package.
Box and padding:
Use a rigid cardboard box — not an envelope, regardless of how well padded. Fill void space with packing material so the inner container does not shift in transit. A case that rattles inside the shipping box is a case at risk.
Label the outside of the box with the laboratory’s address, your practice return address, and a case reference number that matches your prescription. If the box and prescription become separated, the reference number allows the laboratory to match them.
Step 4: Choose the Right Shipping Method
Shipping method selection affects turnaround in ways that many practices do not fully account for when scheduling delivery appointments.
Use a carrier with reliable tracking. BioDent accepts cases via FedEx and UPS. Both provide end-to-end tracking that allows you and the laboratory to know when the case was picked up, where it is in transit, and when it was delivered. USPS Priority Mail is acceptable for some case types but provides less consistent tracking and transit time guarantees.
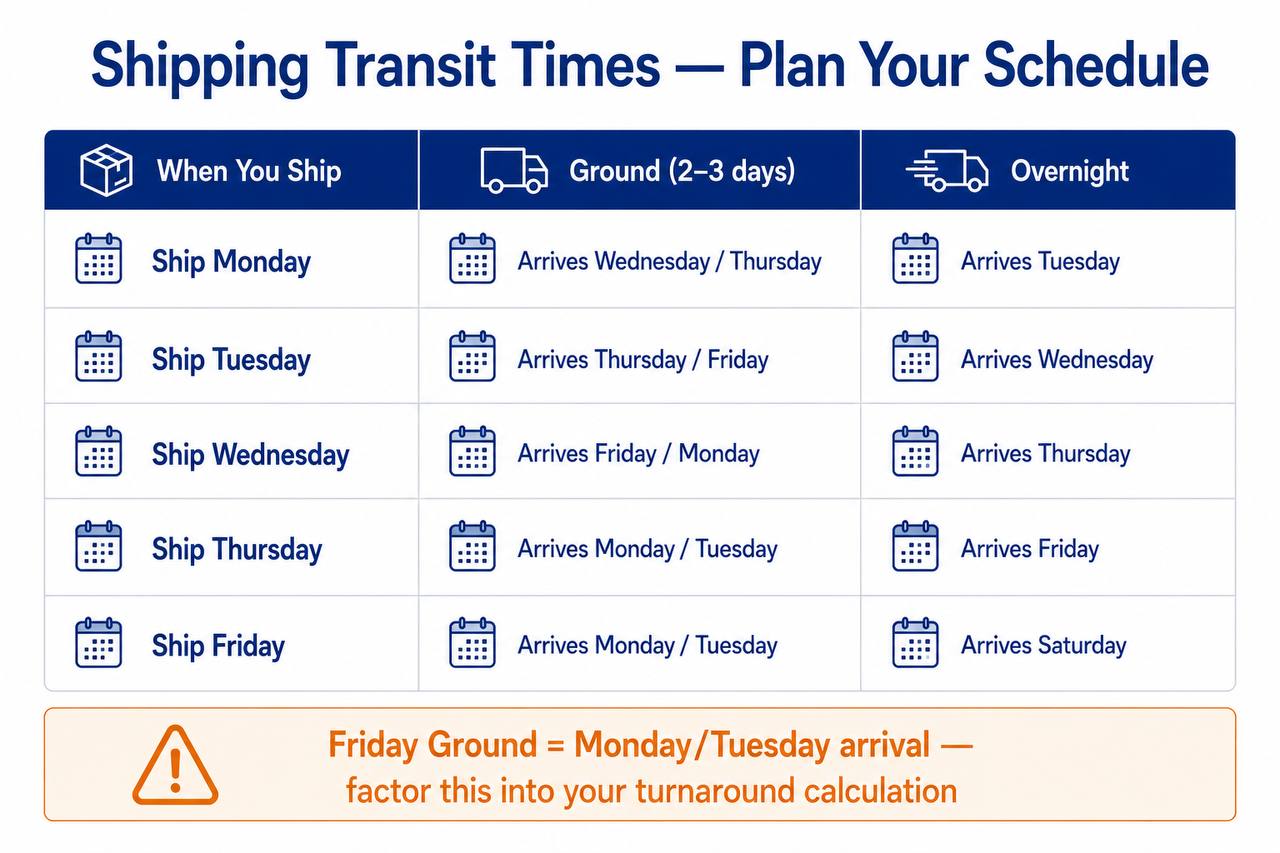
Understand transit time. A case picked up from your office on Friday afternoon will not reach a New Jersey laboratory until Monday at the earliest — often Tuesday in practice. Weekend transit days do not count as business days in most carrier calculations. A case that needs to arrive Monday to meet a turnaround target must ship Thursday or Friday via overnight service — not Friday via ground.
Match shipping speed to urgency. Overnight shipping costs more and is appropriate for urgent cases where transit time affects the delivery appointment. Ground shipping is appropriate for routine cases where the turnaround timeline provides sufficient buffer. Do not default to overnight for every case — but do not default to ground if the transit time will make the return timeline impossible.
Use a return shipping label. BioDent can include a pre-paid return shipping label with your account if you have a practice agreement. Cases returned on a pre-paid label are tracked on BioDent’s account and arrive with consistent carrier handling. If you are not on a pre-paid label arrangement, confirm how your case will be returned before it ships.
Step 5: Communicate After Submission
Sending the case is not the end of the submission process. What happens in the days between case receipt and delivery can affect outcomes as much as the preparation and impression themselves.
Confirm receipt.
A laboratory that acknowledges case receipt the same day it arrives is a laboratory with organized case management. If you do not receive a receipt acknowledgment within one business day, follow up. Cases occasionally get separated from their prescriptions or misrouted — early detection of this is far better than discovering it the day before the delivery appointment.
Respond to laboratory inquiries promptly. When the laboratory contacts you with a question — shade verification, margin clarification, material confirmation — respond the same day if possible. Cases placed on hold waiting for practice response do not count against the laboratory’s turnaround clock. Every day of delayed response is a day added to your total timeline.
Track the return shipment. Once the laboratory ships the case, track it. Know when it is expected to arrive and whether the transit is on schedule. A shipment delayed by a carrier issue can be identified early enough to reschedule the appointment — rather than discovered when the patient is already in the chair.
Step 6: Evaluate the Case at Delivery
The delivery appointment is not only a clinical event — it is a quality feedback loop for your laboratory relationship. How you evaluate and document the result determines how well your laboratory can improve over time.
Assess fit before cementation. Seat the restoration and check marginal adaptation, proximal contacts, and occlusal contacts before any cement is placed. A restoration that does not seat passively, has open margins, or has a clearly incorrect occlusal contact should be returned to the laboratory before cementation — not adjusted into acceptability.
Assess shade in natural light. Shade assessment under operatory lighting is unreliable. Step the patient to a window or use a color-corrected light source before accepting the shade. Minor shade discrepancies that are acceptable to the patient should still be documented and communicated to the laboratory as feedback for future cases.
Document and communicate. If the restoration required significant adjustment at delivery — more than minor occlusal refinement — note what the adjustment was and communicate it to the laboratory. A laboratory that receives specific feedback improves faster than one that only hears “it was fine” or receives returns without explanation.
Return remakes clearly. If a case needs to be returned for remake, include a clear written explanation of the problem — not just “doesn’t fit” but the specific issue: “open margin on the mesial, approximately 0.3 mm gap,” or “shade is two values lighter than adjacent tooth in natural light.” Specific feedback produces better remakes.
Common Mistakes — and How to Eliminate Them
Sending the case without a prescription. Cases that arrive at the laboratory without a prescription are held until the practice is contacted and a prescription is provided or transmitted. This is fully preventable and adds one to three days to the timeline.
Writing “match adjacent” without specifying the adjacent tooth’s material or shade. A laboratory cannot match shade to an adjacent restoration without knowing what material it is made from and, ideally, what shade it was fabricated to. “Match adjacent” on a prescription tells the laboratory nothing actionable.
Not including an opposing arch. No opposing arch means no way to verify occlusal clearance or design contacts. The laboratory will contact you.
Add the opposing arch to every crown case without exception.
Shipping on Friday expecting Monday arrival. Friday shipments on ground service arrive Tuesday. If Monday arrival is required for a five-day turnaround to meet a Wednesday delivery appointment, the case needs to ship Thursday via overnight or the delivery appointment needs to move.
Not pouring the impression before it distorts. VPS impressions begin dimensional change immediately after removal. A case held at the front desk until end of day before being poured may produce a model with measurably different dimensions than a case poured within two hours. Pour immediately or send the unset impression to a laboratory that pours for you.
Calling to check on a case mid-production. A status check call that requires the laboratory to stop production and locate your case adds friction to the relationship and delays the case. BioDent’s team will contact you proactively if there is an issue. Calls to check status are most productively timed to one business day after the expected ship date, not mid-fabrication.
Frequently Asked Questions
What is the fastest way to submit a digital case to BioDent?
Export your scan as STL files and email them directly to BioDent’s case submission address with the prescription attached as a PDF. Cases submitted digitally before noon are typically entered into production the same day. Contact BioDent for the submission email address and any account-specific instructions.
Can I submit prescriptions digitally rather than on paper?
Yes. BioDent accepts digital prescriptions submitted by email alongside digital scan files, or separately for traditional impression cases. A PDF prescription form is available on request. Practices with accounts can also use the laboratory’s online submission portal.
What should I do if my impression has a small void near the margin?
Assess the void location. If it is at the finish line where margin definition is critical, retake the impression. If it is remote from the margin in an area that does not affect fit or design, it may be acceptable — but send the original impression and let the laboratory assess it. Do not assume a marginal void is acceptable without laboratory confirmation.
How do I set up a practice account with BioDent?
Contact BioDent directly by phone or through the contact page. Account setup includes establishing your shipping and billing preferences, setting up pre-paid return labels if desired, and discussing practice pricing if your volume qualifies. Most accounts are set up within one business day.
What if I have never worked with an outside laboratory before?
BioDent’s team will walk you through the case submission process on your first case. Contact us before sending your first case to confirm case requirements, establish the communication channel, and discuss any questions about materials or workflow. The first case is the easiest place to establish good habits.
Start Sending Cases to BioDent
BioDent Laboratory is based in Matawan, New Jersey and serves dental practices across the United States. We accept both traditional and digital cases, work with all major implant systems, and provide direct case communication with technically qualified staff.
New to BioDent? Contact us to set up your practice account and send your first case.
Also relevant: How to Choose a Dental Lab · Digital vs. Traditional Impressions · Dental Crown Turnaround Time